Bullseye Get the app
Solver technical detail

Truing: match the solver to your rifle

A BC from the box and a velocity from your chronograph get you close. Truing gets you the rest of the way: tell Bullseye what you actually dialed to hit at two distances, and it corrects your velocity and drag so every other distance matches too.

True when your real dope at long range doesn't match the solution, usually by a tenth of a mil or more. One good range day is enough.

How it works

  1. Shoot at a middle distance (400 to 600 yd) and a long one (800 yd or more). Note what you actually dialed to hit center.
  2. Open your load in Rifle Setup, go to Truing, and enter both distances and dials, in mil or MOA.
  3. Tap Compute corrections, then Save.

Bullseye solves two corrections together: a velocity offset and a drag scale. Two distances are needed because velocity and drag bend the curve in different ways. True from one distance and velocity has to absorb a BC error, so the hold is right at that distance and off at the others. With two, each correction takes the error it should.

Your bullet's published BC and your measured velocity stay saved as you entered them. Clear truing takes you straight back.
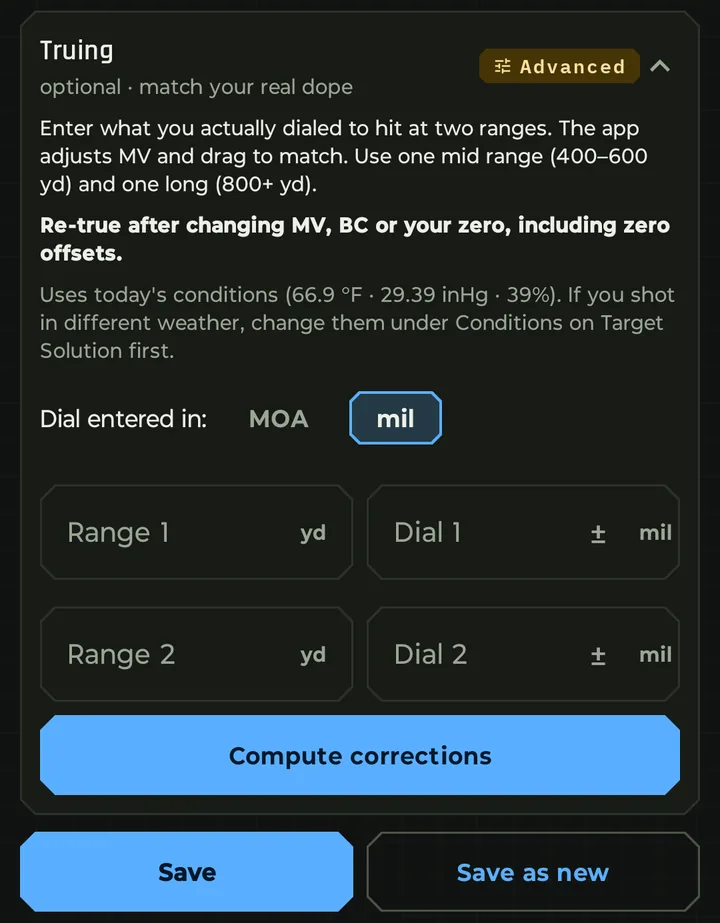
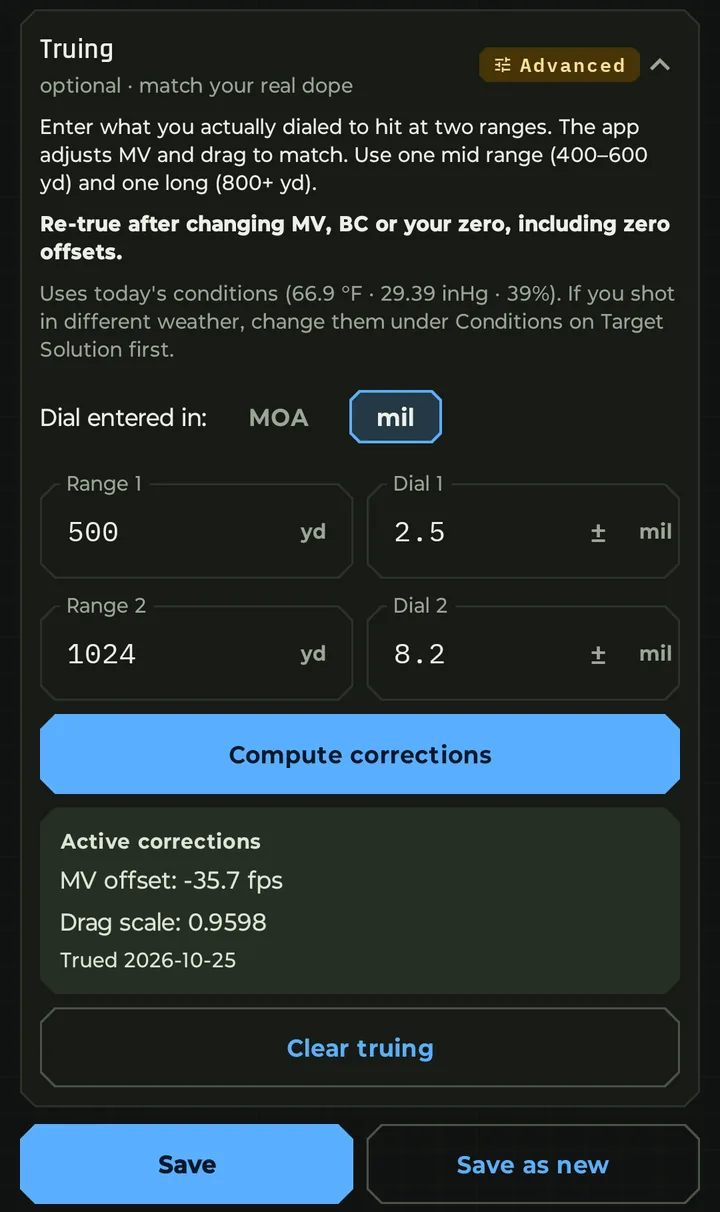
The Truing card in Rifle Setup: what to enter, the reminder to re-true after changing MV, BC or zero, today's conditions, Dial entered in MOA or mil, empty Range 1, Dial 1, Range 2 and Dial 2 fields, and Compute corrections.
The Truing card, ready for two distances and dials
The Truing card filled in: 500 yd at 2.5 mil and 1024 yd at 8.2 mil, with Active corrections of MV offset -35.7 fps and drag scale 0.9598, trued 2026-10-25, and Clear truing.
Trued at 500 and 1,024 yd: velocity −35.7 fps, drag scale 0.9598

Before and after

An example: a 6GT with Berger 109 gr bullets, G7 BC 0.292 at 2,907 fps. The shooter needed 2.5 mil at 500 yd and 8.2 mil at 1,024 yd, a hair more than the app predicted at both. (The entries are made up to show the feature.)

Truing came back with velocity 35.7 fps lower and drag 4% lower. The holds from the app's trajectory table, before and after:

DistanceBefore truingTrued
500 yd2.45 mil2.50 mil
1,000 yd7.83 mil7.87 mil
1,500 yd16.92 mil16.74 mil
2,000 yd31.93 mil31.29 mil

What truing changed in the elevation hold

Trued hold minus the hold before truing. Berger 109 gr in a 6GT, trued at 500 and 1,024 yd

-0.6 -0.4 -0.2 0 +0.2 0 250 500 750 1,000 1,250 1,500 1,750 2,000 Distance (yd) Change in hold (mil) 500 yd: you dialed 2.5 1,024 yd: you dialed 8.2 0.64 mil less at 2,000 yd (46 in) Small where you checked it, large past your farthest shot

The two corrections pull in opposite directions. Lower velocity adds a little hold up close; lower drag takes hold away far out. Where you trued, they nearly cancel and only nudge the hold to match your dials. Past your farthest shot, the lower drag wins: 0.64 mil less at 2,000 yd, about 46 in.

Where the bullet slows past the speed of sound

From the trajectory preview, before truing and trued

0 300 600 900 1,200 1,500 1,800 Distance (yd) Supersonic Transonic Subsonic Before 1,162 1,385 Trued 1,187 1,420

Less drag keeps the bullet faster for longer. It now goes transonic at 1,187 yd instead of 1,162, and subsonic at 1,420 yd instead of 1,385.

Truing scales the drag curve

Drag coefficient by speed, before truing and trued (drag scale 0.960)

0.0 0.1 0.2 0.3 0.4 0.6 1.0 1.4 1.8 2.2 2.6 Speed (Mach, 1.0 = speed of sound) Drag coefficient Transonic Trued Before truing

The drag scale moves the whole curve by the same 4%, keeping its shape. It fits best across the speeds your bullet flew between your two distances. If you shoot well past your long distance, true again farther out.

Tips for a good true

  • Get the basics right first. Check your zero and chronograph your velocity. Truing fixes what's left, not a wrong zero.
  • Use real dials. Enter what centered a group, not one lucky shot.
  • Use the day's weather. Truing uses today's conditions. If you shot in different weather, change them under Conditions on Target Solution first.
  • Spread the distances. One middle distance (400 to 600 yd) and one long (800 yd or more). The farther the long one, the better the true out there.
  • Re-true after a change. A new velocity, BC or zero, including a zero offset, means a new true.
Adaptive wind smoothing

Wind smoothing: steady holds in gusty wind

Live wind from your sensor changes every second. If your hold followed every reading, it would jump with each gust. Bullseye averages the wind first, so your hold follows the wind your bullet will actually fly through.

Your wind readout still shows the live wind. You see a gust the moment it hits; only the hold is smoothed. Wind you enter by hand is used exactly as entered.

How the average works

About once a second, a new reading comes in and is blended into the average. The newest reading always counts most, and older ones fade out gradually instead of dropping off all at once. Speed and direction are averaged together, so a wind swinging between 350° and 10° averages to about 0°, not 180°.

Five levels

LevelNewest reading countsFollows a lasting change in aboutA 10 to 15 mph gust, 3 seconds in
Responsive50%4 s14.4 mph
Balanced40%6 s13.9 mph
Smooth30%8 s13.3 mph
Heavy20%13 s12.4 mph
Max15%18 s11.9 mph

Responsive follows the wind closely. Max lets a passing gust go by and moves only for a shift that lasts.

Matched to your distance

With Adaptive on (recommended), Bullseye picks the level from your target distance. The longer your bullet is in the air, the more an average describes what it flies through, and the less the gust at the moment you fire matters.

Target distanceLevelFlight time, fast 6 mm match bullet
0–500 ydResponsiveunder 0.7 s
500–1,000 ydBalanced0.7 to 1.5 s
1,000–1,500 ydSmooth1.5 to 2.6 s
1,500–2,000 ydHeavy2.6 to 4 s
2,000+ ydMaxover 4 s

Change your smoothing

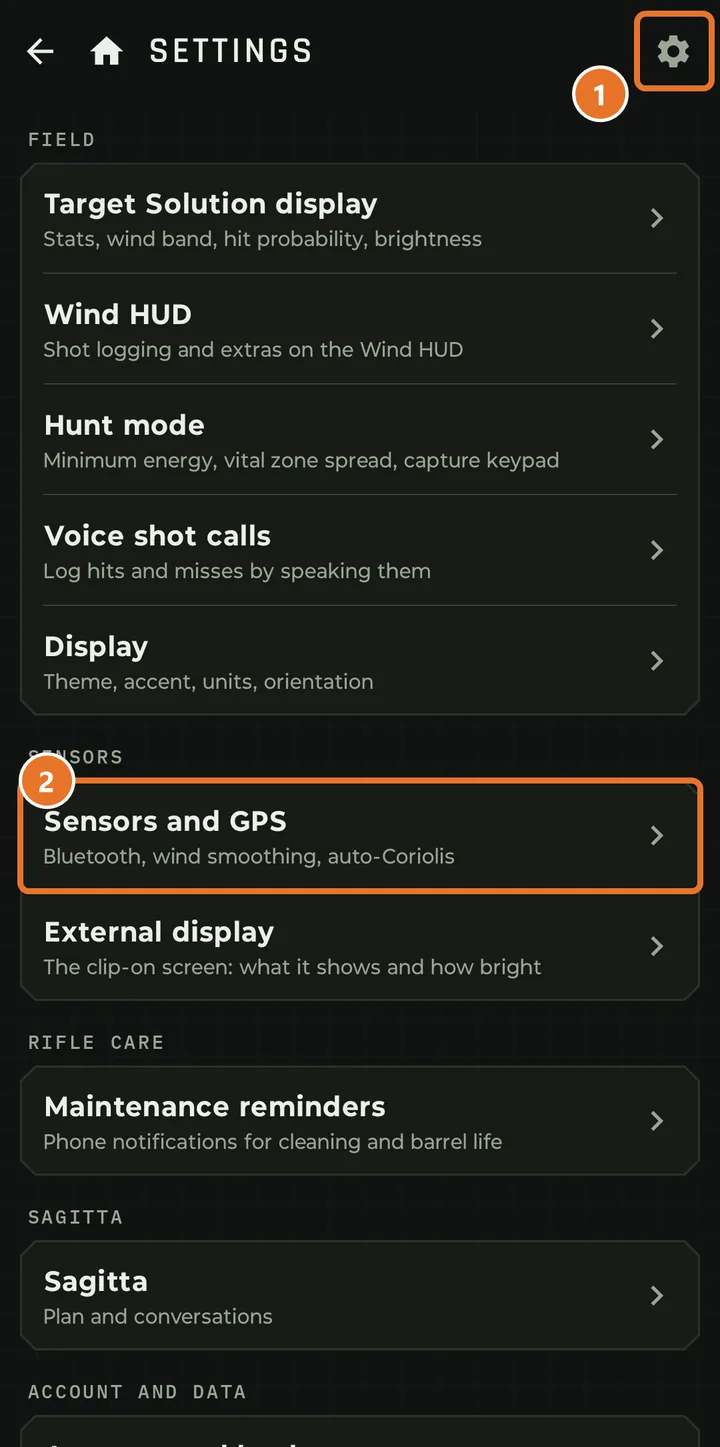
  1. Tap the gear at the top right of any screen to open Settings.
  2. Under Sensors, tap Sensors and GPS.
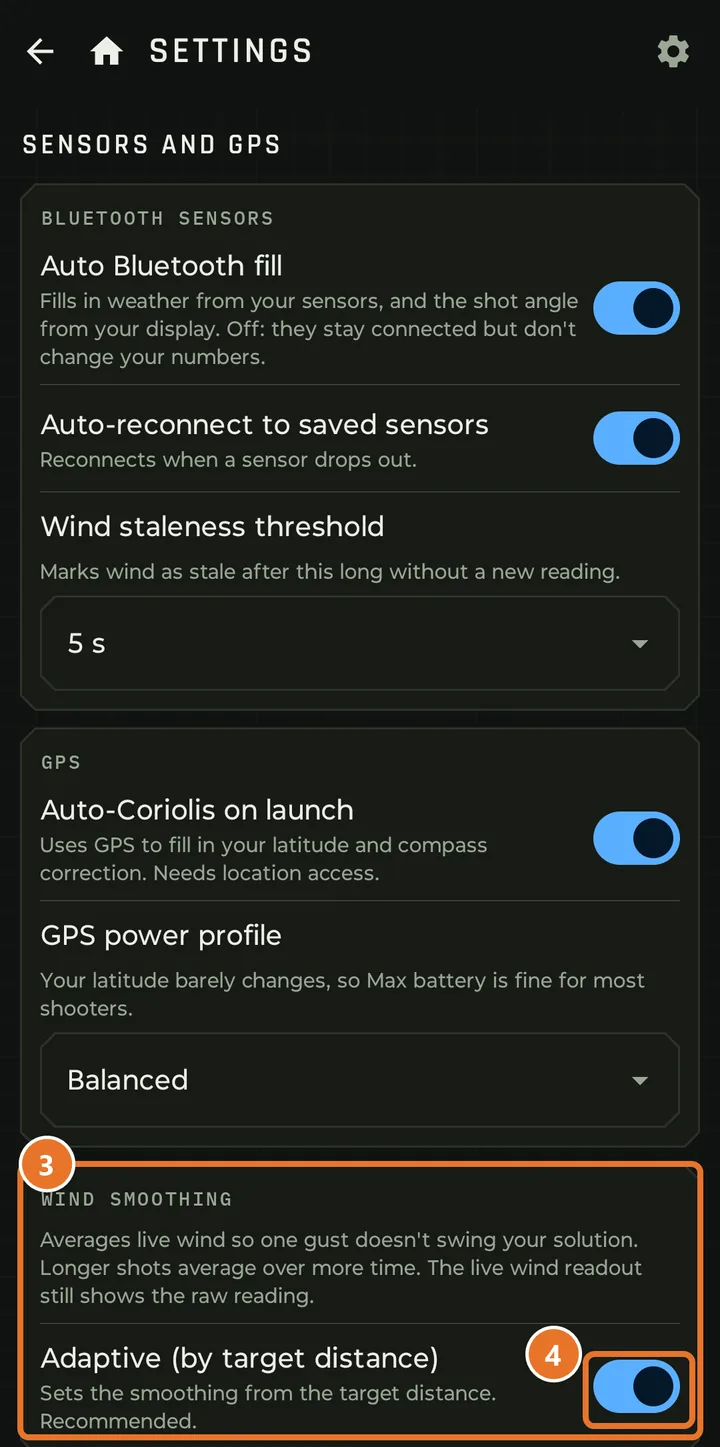
  3. Scroll down to Wind smoothing.
  4. Leave Adaptive on to set the smoothing by distance, or turn it off to use one level at every distance.
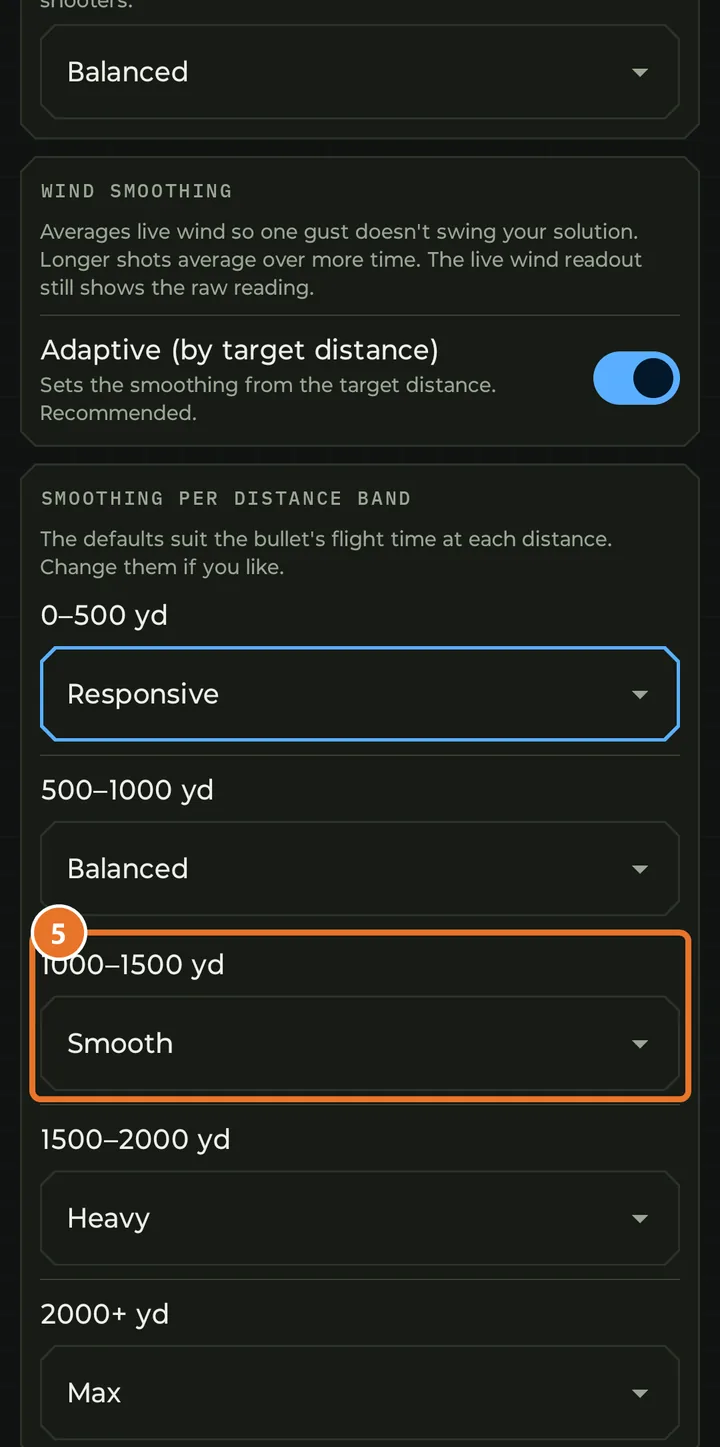
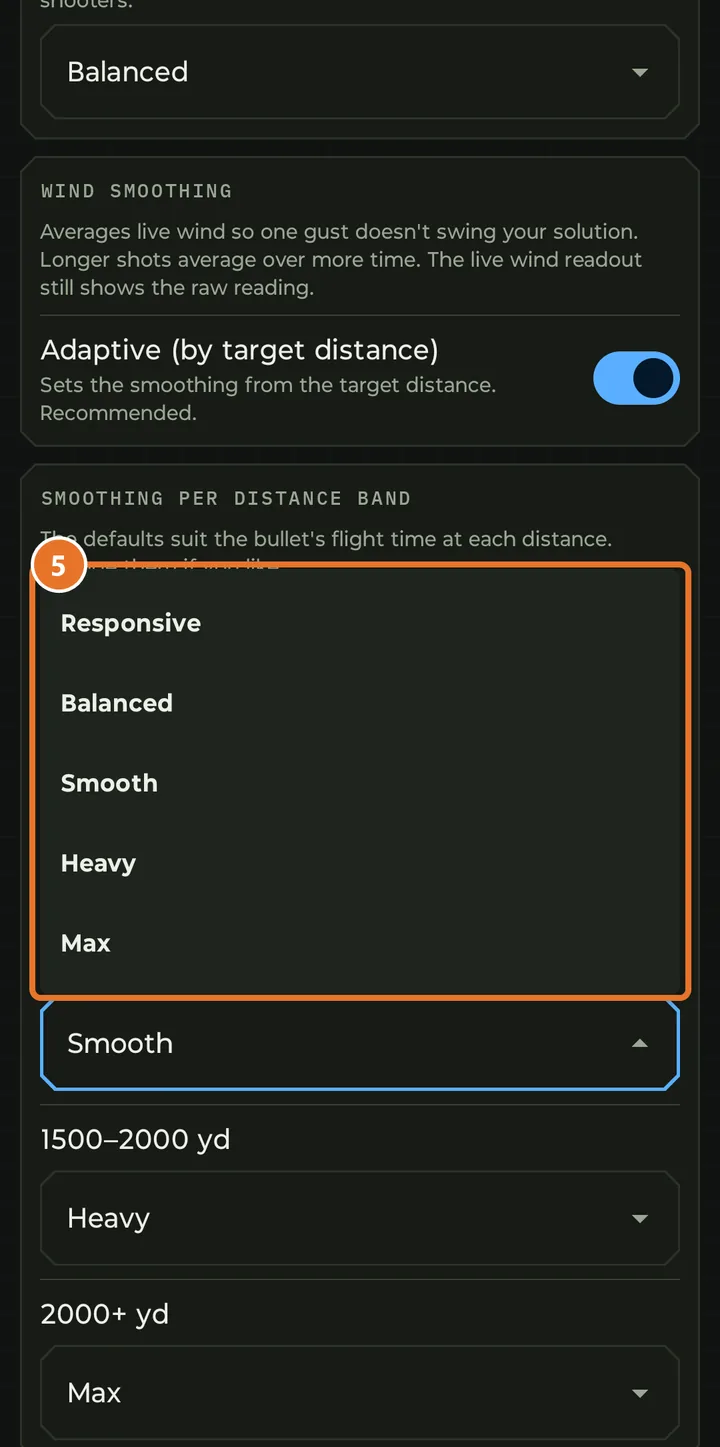
  5. To change a distance band, tap its level and pick Responsive, Balanced, Smooth, Heavy or Max.
Settings, with the gear marked 1 and Sensors and GPS under Sensors marked 2
12Settings, then Sensors and GPS
Sensors and GPS, with Wind smoothing marked 3 and the Adaptive switch marked 4
34Wind smoothing and Adaptive
Smoothing per distance band, one level for each band, with the 1000–1500 yd band marked 5
5A level for each distance band
The five levels to choose from: Responsive, Balanced, Smooth, Heavy and Max, marked 5
5Pick one of five levels

Which to use

  • Gusty, switchy wind at long range: go heavier, so your hold doesn't chase every gust.
  • Steady wind that builds slowly, or you want to fire the moment it changes: go lighter.
  • Not sure: leave Adaptive on with the defaults.

More on how the solver works: Under the Hood →